
The keys to successful cleat gluing
– Dr Yasmine Ghedira –
Qualified ODF specialist

Playback time: 8 minutes
In aligner treatment, the tooth moves mainly thanks to the engagement of the splint on its occlusal, vestibular, lingual, mesial and distal surfaces. The plastic, thanks to its elasticity, will move the tooth towards the position prefigured on the set-up. Attachments, or cleats, play an important role in this process.
Cleats are not always essential for tooth movement. However, they do play a vital role for certain movements in aligner treatment.
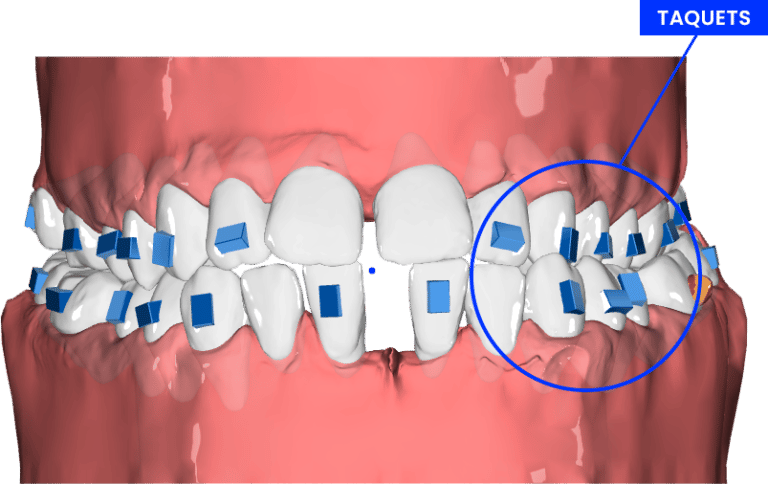
In practical terms, what are cleats?
Cleats, or attachments, are composite resin reliefs bonded to the teeth, usually at the start of treatment.
What are cleats for?
Improving the fit of aligners on teeth
Example: Rotations on teeth with rounded crown morphology, such as premolars, may require additional engagement of the aligner through the use of brackets to help these tooth movements express themselves clinically.
Serve as an anchor for certain types of movement
According to Newton’s third law (the principle of action and reaction), certain types of movement, such as ingression, require anchorage on adjacent teeth in order to exert sufficient force.
Control root axes
Other types of movement, such as translations, mesial/distal rotation or torque, may require cleats to control the root axis.
The shape and position of the cleats are determined by the orthodontic set-up software, according to clinically proven protocols that we have implemented. They will therefore be placed by default according to the biomechanical requirements of orthodontic movements.
Successfully gluing cleats
What you need
Following validation of an Aligneurs Français treatment, you will receive in your treatment box :
- A clinical chart on which the locations of attachments and strippings are marked. It’s a good idea to consult it beforehand, to identify the location of cleats and avoid forgetting any.
- A transfer gutter: made from a special, flexible, high-precision material, to be used for direct gluing of cleats.
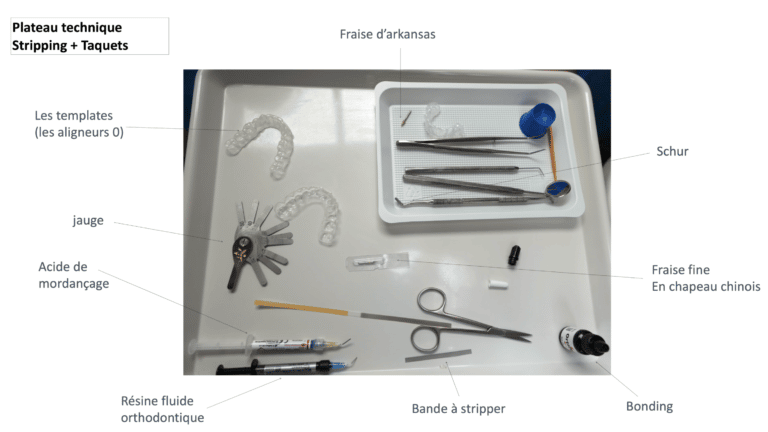
Here’s the technical set required for cleat gluing (and stripping):
Tip: Cleats with strippings!
Attachments should always be bonded before stripping. Stripping often leads to bleeding, which can reduce the effectiveness of your bonding.
See all the steps involved in gluing cleats in the video below:
The stages
The first step is to try out the first aligner (step 1), without cleats, to check that it fits properly.
We then recommend polishing, or even scaling, if the patient has tartar. This increases the chances of cleat adhesion.
Once the location of the cleats has been marked on the positioning tray, the teeth concerned are etched.
The etching is done with ortho-phosphoric acid, which is left on for 30 seconds to obtain the chalky-white appearance of the enamel. After 30 seconds, vacuum and rinse.
A layer of light-curing adhesive is then applied (or not, depending on the product used).
The cleat housings in the transfer channel are then filled with fluid composite resin. Remember to keep your bonding surfaces protected from saliva to reduce the risk of attachment delamination.
Gently insert the transfer tray, then, while holding it in the mouth, light-cure the cleats, one by one.
Before light-curing, it’s essential to apply the tray to the tooth using a mouth spatula or pre-cure tool, in a vestibulo-lingual direction, but also vertically, so that the resin is in contact with as much of the enamel surface as possible.
The splint is gently disinserted, starting on one side, then anteriorly and finally on the other side, in order to preserve as much as possible the attachments that have just been fitted.
It is also advisable to wait a short time before disinsertion, so as not to weaken the cleats.
Once the transfer tray has been removed, clean excess resin and adhesive from around the cleats using a burr.
The final step is to try out the gutters with the cleats in place, to make sure they fit properly.
Expert tips
Four-handed work is ideal for this procedure. While you fill the cleat housings with composite, your assistant keeps your bonding surfaces dry.
Make sure there is no play between the tooth and the transfer tray during light-curing.
These are the essential points to master for successful cleat gluing.
I hope you found this article interesting! Don’t hesitate to send me your feedback by email: